Tutorial Preview
Highlights
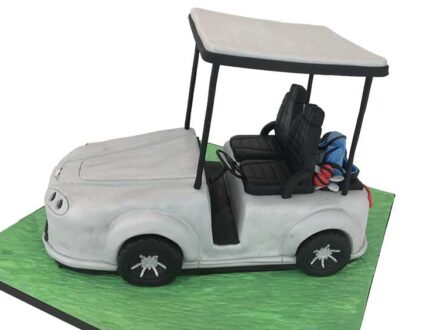
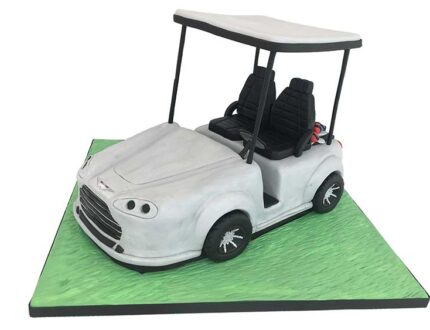
Highlights from the Aston Martin Golf Cart cake tutorial.
1. Sketching and carving
Golf carts are similar to cars when it comes to creating a cake from the design. Paul first gets a load of images from google to get the various angles and dimensions, then sets about a rough sketch. It takes a few attempts, but then he’s ready to start carving.
2. Ganaching
Paul introduces a new amazing ganache using Gold Quintin chocolate from Carma. As Paul’s going to the party he wants to give this cake his best ingredients so also applies a generous coating of Baileys Irish Cream. He then applies a thin layer of dark chocolate ganache on the outside to keep everything in place.
3. Smoothing the ganache
It’s important to spend a little time at this stage smoothing the ganache in preparation for the sugarpaste. Watch how Paul diligently goes around smoothing and filling the holes as he gets ready for the sugarpaste to be added.
4. Covering the trim and wheel arch
Time to add the trim wheel arch using a very simple, effective technique.
NOTE: Paul later discovers that when creating the wheel arch, in hindsight he should have cut the wheel arch where it meets the trim.
5. Icing the cake
Covering the cake is always a challenge with an awkward shape, but watch how Paul carefully covers then massages the sugarpaste to show those key features covered below.
6. Creating the front grill and headlights
Using the image from google as a guide Paul creates a bespoke template to cut out the sugarpaste for the grill and headlights. With some extra shaping and some unique tips along the way the front of the cart really starts to take shape now.
7. Finishing the grill
Detail is always important when it comes to cars or carts. In this lesson, Paul adds the lights and finishes the grill with some very fine intricate work.
8. Adding the wheels
Paul creates the sporty cart wheels using simple techniques to great effect.
9. Adding the seats
This is where Aston Martin meets golf cart! Paul shapes and styles the seats to give them that luxurious look, befitting an Aston Martin.
10. Making the roof
I’ll bet you wondered how Paul would make the roof? All is revealed in this lesson and it’s that classic case of once you know, it’s so easy.
11. Making the roof supports
Paul now creates the roof supports and covers in sugarpaste to keep the consistent sporty colour scheme going on.
12. Adding the dashboard and roof
Paul now creates a simple dashboard and steering wheel then adds the roof before finishing the lesson by painting the grass.
13. Adding the cart details
Time to add those little details that make all the difference a the ribbon, number plate, lights. Paul then uses some poetic license by adding exhausts to an electric cart!
14. Golf bag and finishing touches
This is where you can personalise the cake by adding the recipient’s set of clubs to the cart. Paul then adds some finishing touches before presenting his finished Aston Martin Golf Cart.
15. Other ideas
Some other ideas for this type of design.
16. Pro lesson
Everything a professional or someone looking to sell this type of cake needs to know
Learn how to make an Aston Martin Golf Cart Cake
Learn how to make this stylish Aston Martin Golf Cart Cake with the multi-award winning Paul Bradford.
In this tutorial, Paul shows us how to make this Aston Martin Golf Cart he made recently for a friend’s birthday who…you guessed it! Loves golf and drives an Aston Martin. Perfect for the golf or car lover in your life. There are lots of ‘Ace’ techniques to learn in this one!
In this tutorial, the skills you learn include…
- Cake carving
- Working out scale
- Painting
- Modelling tyres and car seats
- and much, much more
Don’t forget to share your interpretations of this wonderful cake with Paul and the rest of the CakeFlix community on our Facebook group.
View hundreds of more world-class tutorials only at www.cakeflix.com.


