Toy Box Cake Decorating and Baking Tutorial

Tutorial Preview

Join NOW to access 1718 courses Watch Now
7 Day FREE Trial
Toy Box
with Laura Dodimead
Skill level: Intermediate
HD Lessons: 27
Decorating time: Two Half Days (allowing for drying time)
Now Playing
09:25

Highlights

This is the place to be if you are struggling to find the time to watch the whole tutorial. This video is a condensed version giving you some of the key points that should help you get an idea of how to approach making this wonderful cake.
Now Playing
05:41

1. The Toy Box and Board

Struggling for time? Why not click here to go the highlights video.

Laura starts by showing us how to create the wonderful toy box. Simply make lots of scratch marks with a craft knife and then dust over this with a chestnut dust that builds up an old, worn wooden effect. Brilliant! We have a perfect, miniature antique toy box. As for the realistic carpet effect on the board, this takes some time to achieve but we’re sure you’ll agree that they result is worth it. No fancy tools here, just a pair of tweezers.

Now Playing
07:34

2. Making the Blanket

In this lesson, Laura shows us how to make the cute blanket that rests on top of the toy box. This is very simple and is made up of two colours of sugarpaste, but of course you can use as many as you like. Once she rolls out her base colour, which is white, she then rolls out and cuts out long thin strips of yellow sugarpaste and places them roughly an inch apart and then goes over them with a rolling pin. You don’t even need to use water with this technique as it would only saturate the sugarpaste as it is rolled out quite thinly.
Now Playing
16:30

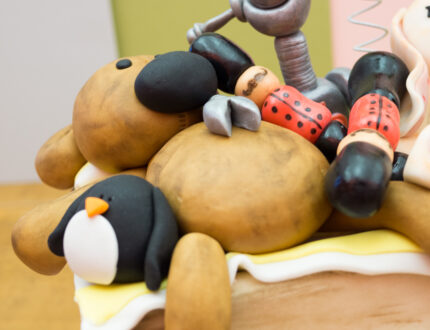
3. Making the Teddy Bear

Lets start making the toys! Laura starts us off with a little teddy bear which involves some simple modelling and a little stitching work and you will easily get the same results. Laura then dusts the teddy to achieve a slightly worn look. Alternatively, you could use the same technique used for the board to create a fluffy texture, bearing in mind that this will take longer to do.
Now Playing
06:37

4. Making the Penguin

This little guy is probably the quickest toy to make out of this tutorial – he’s simply to create and adorable. Of course you can add more details such as feet or a little hat for example. Have fun and get creative.
Now Playing
24:29

5. Making the Robot

A lot of simple techniques are used to make this toy but it does require sensitive touches as you shape the small pieces of sugarpaste into rectangular shapes and so on. You can always use cake smoothers or even a ruler to help square the shapes. If you don’t have small square cutters, it is easy enough to cut little squares, although plunger cutters will be handy to create those tiny circles.
Now Playing
05:35

6. Finishing the Robot

Now that we’ve made the robot, it’s time to give it a nice metallic finish to add some realism to it. Laura uses a silver dust which she adds with a dry brush and then uses a cotton bud dipped in confectioners glaze to seal the dust and create a nice plastic shine.
Now Playing
14:28

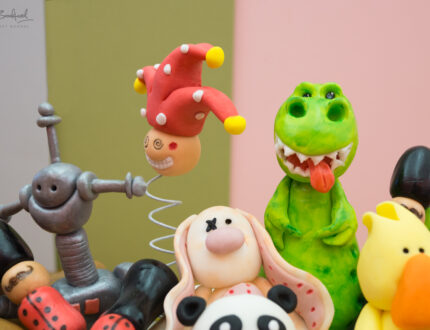
7. Making the Dinosaur

Laura uses a lime green sugarpaste to create her classic toy dinosaur, but of course you can use any colour of sugarpaste you wish. It will be a good idea to add some CMC to it to help strengthen it. When you work the CMC powder into the sugarpaste, remember to work with it right away as it can set quite quickly.
Now Playing
13:40

8. Finishing the Dinosaur

When making the teeth, you will find Laura’s second technique much quicker. Simply roll out a small, thin piece of white sugarpaste and then cut triangles into it to create sharp teeth, before attaching to the mouth. Once you have completed the dinosaur, all you need to do is dust it and glaze it the same way as the robot.
Now Playing
12:36

9. Making the Duck

The duck’s body is created by making a small, fat pear shape much like the dinosaur. The legs are then attached separately on top of the box, with the body placed over them to keep them in place.
Now Playing
23:36

10. Making the Rabbit

You will need some ivory white and vintage pink sugarpaste if you would like to create a similar looking rabbit to Laura’s, and have some pink edible colouring pen at the ready. Something else you may want to have to make things easier for you is small heart cutters which are used for the feet.
Now Playing
12:33

11. Making the Panda

The panda is made up of two large white balls of sugarpaste with the head being bigger to add to the cuteness.Then it’s simply just a case of adding smaller balls of black sugarpaste each manipulated slightly to create feet, ears and eyes. Simple!
Now Playing
13:09

12. Making the Jack-in-the-Box

In this lesson, Laura uses MMP (Mexican Modelling Paste) and flower paste as opposed to sugarpaste as it sets stronger than sugarpaste which is handy for smaller or more intricate shapes. An edible colouring pen will definitely be required to draw the eyes if you want to get that same crazy effect Laura has gone for! For the spring, Laura uses 18 gauge wire.
Now Playing
11:16

13. Making the Toy Soldiers

Laura uses MMP and flower paste for the soldiers as well, and a wooden skewer/toothpick to hold it all together. Once you have created the shapes and put the skewer through, it’s simply a case of drawing on the detail with an edible pen and then glazing it to give a nice plastic effect.
Now Playing
14:04

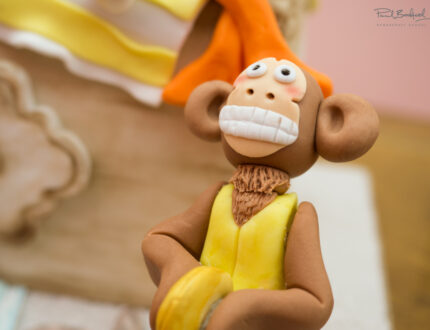
14. Making the Mechanical Monkey Pt 1

In this lesson, Laura shows us how to make the legs, feet and body of the monkey. She demonstrates a quick technique for making two feet with one piece of flower paste which is a great time saver, as well as creating cute stripes for the trousers. As well as that, she shows us a great technique for making a waistcoat with the chest showing at the top.
Now Playing
10:37

15. Making the Mechanical Monkey Pt 2

Now it’s onto the monkey head. When it comes to the ears, you will need to use toothpicks to attach them to the head securely as water or edible glue will not be strong enough to hold them.
Now Playing
07:30

16. Completing the Mechanical Monkey

Laura now shows us how to make the arms and cymbals. This can be quite tricky due to the weight of the sugarpaste, so allow plenty of drying time and put something under the arm to hold them up while they dry and leave overnight.
Now Playing
13:06

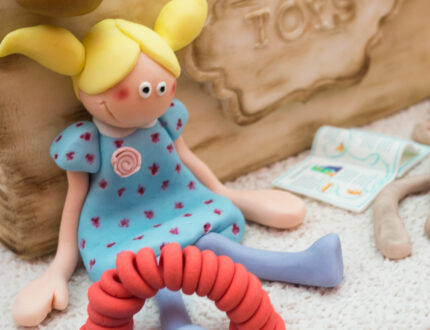
17. Making the Rag Doll Pt 1

Laura shows us a very simple way to create the body and as this model is sitting down against the box, there is no need to have it upright. This allows us to make the ragdoll as big as we like. The arms and legs are created in much the same way as the limbs for the other toys and then all we need to do is create a nice dress collar for the rag doll. Watch and see how this can be made in a matter of seconds.
Now Playing
10:49

18. Making the Rag Doll Pt 2

Now it’s time to make the rag doll’s head and you will witness the many uses for a circle cutter in this lesson. You will also learn a nice quick method to make cute hair with the help of toothpicks and croissant shaped sugarpaste.
Now Playing
04:43

19. Finishing the Rag Doll

First of all, Laura draws some dainty designs on to the dress using a red edible pen. You can get creative here and use lots of different colours or even add some designs with cut-outs. For the corsage, Laura uses a great technique for making small roses in under a minute.
Now Playing
11:03

20. Making the Monkey

This monkey is completely different to the mechanical one and will be placed lying down on the board, so will be a lot quicker and easier to make. No need to worry about drying times or weight.
Now Playing
07:51

21. Finishing the Monkey

Now, just to make the body and once again, as the monkey is lying down, there’s no need to apply support. Laura suggests that if you would like to give it a fluffy teddy texture, you could dab it with a toothbrush or even roll the sugarpaste between scouring pads. Both techniques are very quick and clever and will will achieve a lovely effect.
Now Playing
04:56

22. Making the Slinky

Laura shows us how to make a cute little slinky using some flower paste with CMC to add extra strength. Once you have shaped it and have a nice arch shape, place a rolling pin under it to support it and allow it to dry for a while so that it can sit freely on the board.
Now Playing
06:19

23. Finishing Touches

To finish off, Laura shows us how to make beautiful miniature books that are strewn over the board to add a child-like mess. Once they are made, it’s just a case of adding the mechanical monkey to finish it all off. On this occasion, Laura found that by using royal icing she was able to better secure the arms and cymbals for the monkey so you may want to do the same.

We would love to see your versions of this cake so please share your pictures with us on our Facebook Page as well as Laura’s Facebook Page.

Now Playing
01:10

24. Other Ideas

Laura shares some ideas you can implement when making this cake to make it unique to you.
Now Playing
03:56

25. Pro Lesson

In this lesson Paul, goes into detail about the cost to make this cake as well as how much you should charge for a cake like this. This is vital information for those of you who own your own cake decorating business.
Now Playing
02:33

26. Interview with Laura Dodimead

Let’s find out more about the person behind the cake shall we? If you would like to follow Laura and her amazing cakes, hop on over to her Facebook Page.

Laura Dodimead introduces us to her wonderful kids’ Toy Box Cake. Not only is it a child’s dream cake, but it is also completely edible! Could you really bring yourself to eat the cute little toys though?…We certainly couldn’t. This is a fantastic cake for learning various different modelling techniques. It’s perfect for a child’s birthday and can be adapted to include their favourite toys and characters.
Laura Dodimead

Laura Dodimead

Laura Dodimead of Cakey Bakes Cakes started her business from her little flat in Farnham. After many compliments and encouragement from family and friends on her first attempt of a ladybird birthday cake for her eldest daughter's 1st birthday bug party, she decided to test the water and applied for a local stall and approached local bakeries to stock her goodies. From here, things snowballed and today she runs her bespoke cake decorating business, Cakey Bakes Cakes. Her designs are instantly recognisable, with the gorgeously hand-crafted models and playful designs.
* indicates a required field
7 Day Free trial