Tutorial Preview
Highlights
Struggling for time? Then you’ve come to the right place. In this lesson, we have carefully selected all the key points covered in the tutorial and condensed these into one video which you can view in under 15 minutes.
1. The Design and Structure
Struggling for time? Why not watch the Highlights lesson.
In this lesson, Paul talks us through his idea and boy is it a good one! Not only do you get a beautiful tasty cake but fresh flowers as well! If woodwork is not your strong suit then perhaps you might want to get someone to help you as cutting out a circle with a jigsaw can be quite tricky. Once the structure is made, it’s all very straightforward.
2. Finishing the Structure
This is a nice quick lesson and Paul shows us how he has inserted the watering can’s spout. All you need is a power drill and a “spade bit” drill size 12mm. This type of drill creates a nice clean hole and is definitely worth getting. Once you have cut out the hole, simply put the wooden dowel in and hot glue it in place and hold it for a couple of minutes so it dries in the right position.
3. Adding Cake to the Structure
Time to play with some cake! That’s why we’re all here after all. First of all, we need to make it food safe so Paul cleverly uses a little bit of tin foil to stop any glue from touching the cake. Once you have secured the card down and checked that there is no glue seeping through anywhere you can move onto cutting your cake. Measure the distance from the outside of the base to where the spout starts and then cut out sections of your cake accordingly so that it sits in the centre and wraps around the cake. Remember to keep the wedges that you cut out as you will be using them in the next lesson.
4. Ganaching the Cake
As Paul’s cakes don’t usually get eaten (very sad, we know!) he doesn’t see the need to half the cakes and ganache them and re-stack them so just goes right ahead and stacks them on top of eachother. Of course you will want to do the usual and get plenty of layers in there. Once you have done this, simply ganache the cake and smooth it down a little and see if you have space to fit it in the fridge for a few minutes. Placing it in a cold room for a little while longer will do the trick if there’s no space in your fridge. Now just cut out a section of cake in the middle at the top of the cake for the plastic flute to go down so your flowers have somewhere to sit.
5. Covering the Cake
As you may have noticed, this is a pretty big cake and so will need quite a lot of sugarpaste. Just to cover the cake you will need around 1.5kg of white sugarpaste. Start of by rolling out a large piece of sugarpaste around 3mm in thickness and cut a slit into it to allow it to wrap around the spout – the sugarpaste should join in a line under the spout. To get rid of the join, simply brush the join with a damp paintbrush and then cover it in icing sugar and rub it in with your hand. Paul uses acetate smoothers to get a lovely finish and then focuses on the top using one smoother along with his index finger to get a nice sharp edge.
6. Decorating the Cake
Now that the cake is covered, it’s time to start making it look pretty. Paul uses a broach mould by FPC and uses snowflake glitter to help get them out easily. Just lightly brush some glitter into the mould, roll up a small ball of sugarpaste and drop it in, then press it down with a smoother and it should lift out onto the smoother. Once you have made them all up, paint a line of edible glue around the top of the cake and add them to the cake.
7. Decorating the Cake Pt 2
Paul has gone ahead and added some more sausages to the cake which adds to the nice vintage feel. You can give even more texture to it by adding rivets by simply pressing in small indents with a ball tool around the cake. Now it’s onto the spout. Paul confesses that the spout is actually a little higher up the cake than he would have liked but thinks of a clever way around it which is actually very simple as you will see in this lesson.
8. Adding the Handle
To make the handle, Paul uses to 18 gauge wires taped together with florist tape and then bent to shape. He then puts two posy picks on each end and inserts it into the cake. To cover it, he rolls out a long sausage and cuts down the centre of it, applies some glue to the slit and then wraps it around the handle. Easy! Just make sure you don’t add too much glue and make sure the slit is deep and wide.
9. Adding the Top Handle
To make the cake card Paul has cut the lids from 14” cake boxes and has cut strips that are 3cm in width. He then takes two strips and uses edible glue to attach them ontop of each other. He then rolls out white sugarpaste about 3cm in thickness and cuts two strips a little wider than 3cm and covers both sides with the help of some edible glue. Paul once again uses his small ball tool to put some rivets along the edges of the handle. To attach it to the cake, simply cut away some sugarpaste from either end exposing the card and press it into the cake until the card is immersed in cake.
10. Preparing the Board
This may feel quite unnatural but perhaps quite liberating – now that we have just iced the board, Paul tells us to put make some big marks on it! Go on…have some fun and it will look very effective by the end. Once we have had fun denting the sugarpaste, it’s time to start painting over the marks so that they stand out. We would recommend that you use a relatively light colour for the dents as you don’t want them to be too blatant. Don’t worry if you don’t have an airbrush as you can get a great result by painting with brushes. Just remember to always brush in the same direction, as you want the board to have a wood grain effect.
11. Painting the Cake
Paul starts of by adding some more colour to the board and it looks scary at first but quickly begins to take shape as he goes over with different shades of brown to add depth. Now it’s onto painting the cake. Paul uses Double Cream dust by Squires Kitchen and mixes it with quite a large amount of 96% alcohol which works very well and looks great once it’s dried. Once painted, while it’s still wet get a dry large soft brush and brush around the cake to add texture.
12. Painting the Cake Pt 2
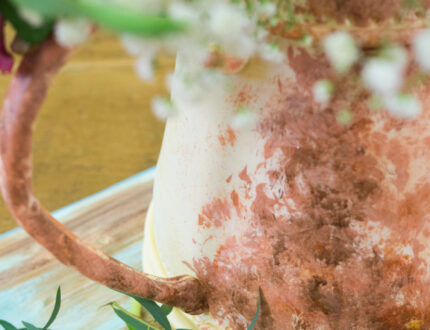
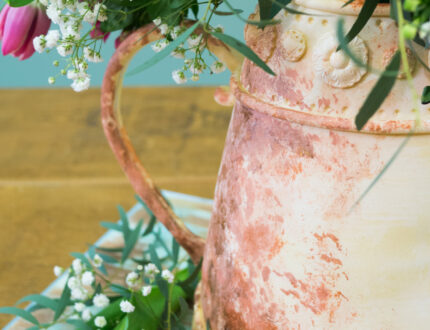
As you can see, the watering can is really starting to take on a vintage feel t but there’s definitely more that can be done to give it more character and Paul has all the tricks up his sleeve to do just this. First of all, Paul paints over it all in a very thin layer of white and dabs it with kitchen roll as well as the end of his brush to add texture. If, like Paul, you would like to add a rust effect simply mix white, orange, brown and red paint little by little until you get a nice rust colour. Dab it on with a large brush and dab any excess away with some kitchen roll. It may look quite frightening at first but as it dries it will look more subtle and realistic.
13. Finishing the Board and the Cake
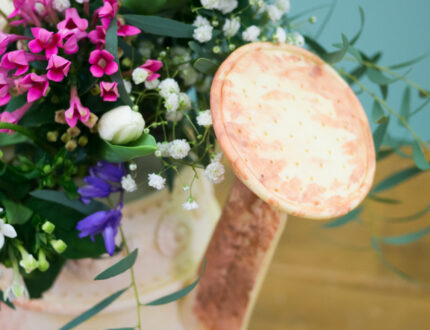
Paul starts of by whitewashing the board in much the same way as the cake which gives it a lovely finish and makes the brown streaks less severe. Make sure that the board is dry before you do this otherwise the colours will mix and ruin the whole look. Paul shows us how to make the sprinkler head which is very easy to make.
14. Transferring the Cake and Arranging the Flowers
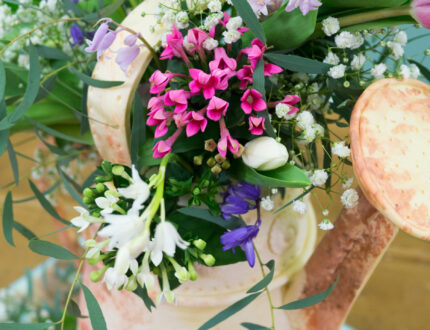
You may want to get a second pair of hands to help you when transferring the cake due to it’s weight and size. As Paul won’t be moving the cake anywhere he doesn’t need to secure it to the board permanently but you will want to put down a little ganache or royal icing to keep the cake securely attached. Now it’s on to the flowers! Joining us is the wonderful Natasha Bell from Tupelo Tree who will be doing the arranging of the flowers. Natasha uses a mixture of pink tulips, gypsophila, bluebells, flocks and eucalyptus for a lovely wild country garden feel. Natasha says that she always starts with greenery and ends with greenery when arranging flowers and shows us some clever tricks and tips along the way.
15. Finishing Touches
Paul has gone ahead and added on a lovely blue ribbon to match the board and Natasha goes onto finish of the board by spreading some flowers around the bottom of the cake which really finishes it all off perfectly. And the cake is now complete…well done!
16. Other Ideas
In this lesson, Paul shares some ideas that you can implement when creating this cake to make it unique to you. We would love to see your versions of this cake so please share your pictures with us on our Facebook Page as well as Natasha’s.
17. Pro Lesson
In this lesson, Paul gives some insider information for this cake including the cost to make it as well as how much you should price the cake at when selling it – vital information for any professional cake designer.
Paul introduces us to this beautiful vintage style Watering Can Cake, complete with fresh flowers arranged by the wonderful Natasha Bell from Tupelo Tree Garden – perfect for a summer celebration. This tutorial is full of brilliant techniques and uses many different skills from basic woodwork, airbrushing and painting to arranging fresh flowers. Aimed at intermediate level cake decorators, the cake will take two half days to create, allowing for drying time.
This vintage watering can cake is a delightful and charming centerpiece for any garden-themed party or gathering. The cake is topped with a realistic-looking watering can, complete with a spout and handle. The watering can is surrounded by lush green grass and colorful flowers.
The Cake
The cake itself is a moist and flavorful vanilla cake. It is iced in a light green frosting, which gives it the appearance of fresh-cut grass. The cake is topped with a chocolate watering can, which is made from a combination of melted chocolate and modeling chocolate.
The Watering Can
Identify the watering can is the focal point of the cake. It is made from a combination of melted chocolate and modeling chocolate. The melted chocolate is used to create the spout and handle of the watering can. The modeling chocolate is used to create the body of the watering can. The watering can is then painted with edible gold paint to give it a vintage look.
The Flowers
Flowers surrounding the watering can are made from a variety of edible flowers. The flowers are arranged in a natural, haphazard way to create a realistic look. The flowers add a touch of color and whimsy to the cake.
We would love to see your take on the Watering Can Cake – please share your photos with us on our Facebook Page!
Check out our extensive library of Cake Tutorials.


